

While ONfungi’s Scott Hortop is the wizard of compost with his large bioreactors, there’s room for smaller bioreactors. In today’s post, ONfungi’s Kelvin Hodges builds a simple home bioreactor.
For the inoculate see our shop here. Buy your bioreactor starter kit here. Remember, the bioreactor inoculate kit greatly improves your fdc by introducing a large fungal spore range right from day one.
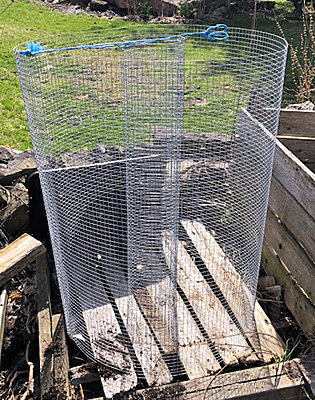
Kelvin’s bioreactor build

Hi everyone, for my home bioreactor build I started with some basic 1×2″ wire mesh fencing from a local hardware store. I used tin snips to cut the mesh into two pieces. One piece would be for the main bioreactor and the second piece was for the air vent in the middle. Remember, to keep your bioreactor from going anaerobic you want to keep the digesting material within about a foot of air.


The next step is to mulch the leaf material. In this case I had 4 bags of leaves from last fall. I used my mower with a mulching blade and filled the hopper. I then put the mulched leaves into the tin wash basin and soaked with water (unchlorinated water. Mine came from the local creek).
I did add a handful of ONfdc to enhance the fungal content of the leaf mass. You can buy a starter dose here.

Now load the wet leaves (but not too wet) into the home bioreactor. Not shown, I soaked the leaves for a few minutes and then used a screen to drain the leaf soak back into the tin bucket. This meant I didn’t have to fill the bucket with water as often. I still used 25 gallons of water.


and clean up…
You’re done! Put away the tools.
I used the left over leaf soak to water the gardens. Lots of good nutrient in there I imagine.
Thanks for reading — Kelvin
The key features of ONfdc inoculate kit
- Very high 3.7 to 1 fungal dominant ratio means your fdc is off to a superb start
- the ONfdc production site is close to a remaining stand of old growth forest; a rich source of fungal spores that now go into your fdc
- Scott’s many years of experience and care is proven to create a better fdc — get your bioreactor off to the best start!


5 Comments
Terri Bocz
Thanks for sharing these nice simple instructions. I’ve just a few questions please:
1) Would it be ok to fill the bioreactor right to the top) with damp leaves, instead of just half-way? (I have about 100 full leaf waste bags collected from our community fall 2021.)
2) Should I pack down the leaves or leave them loose?
3) May I top up the bioreactor midsummer, when the partly decomposed leaves have settled? …and adjust the maturation date?
4) Is the bioreactor best in sun or part shade?
5) Do strong rural winds damage the developing hyphae? (If so, I’d have to site the bioreactor out of the wind.)
Thanks for any answers!
Terri
admin
Hi Terri,
1) I ran out of leaves and will be trying to find more. Filling to the top recommended. You may also want to pre-mulch some extra leaves to top up the reactor as the mass settles down.
2) the leaves will do a good job of settling on their own. But some pushing and squeezing can speed up the self-compacting. Up to you. Don’t get too carried away. Oxygen is required.
3) Maybe not mid-summer. But you certainly can top up.
4) Good questions. I’ll get back to you.
5) As you are trying to maintain a 70% humidity level I would avoid high winds as they will dry out the bioreactor.
Kelvin
A few notes from Kelvin
After various experiments:
* You DO NOT need landscape fabric to protect the leaf mass from drying out. Seems to stay pretty good regardless. So the netting is sufficient as long as it contains the biomass being composted.
* I like wire mesh netting. Cheap and long lasting. There is some debate, but Kelvin likes metal over plastic netting to avoid possible chemical contamination.
* topping up may be done over the first few weeks. Its a multi year process. Its not recommended to top up during the summer. The settling is the digestion process at work. Start a new bioreactor or store your biomass until you have enough material for the next bioreactor. We have successfully stored leaves for a year just on the ground.
If you leave your bioreactor in a windy/sunny spot. Please report back with how it went. Remembering to keep your moisture level around 70%. To date we have no information that indicates you need to tend delicately to the bioreactors.
Garth Wunsch
I’m always happy to see ppl trying JS and other composting. From personal experience, I offer a few suggestions. I built my first reactor inside my greenhouse last fall and followed Dr. Johnson’s instructions very closely. The links are on this website.
You have omitted the fabric liner and without that you will have excessive drying on the outside due to sun and wind. I’m not sure you have enough internal ventilation, but perhaps so. Follow David’s guidelines.
The bin must be filled in one day and never topped up. A full bin will quickly have an initial heating/thermophilic phase and once cooled below 80°F, you should add about one pound of red wriggler worms. They’re the main players along with the rest of the microbiological community.
My bin is 36” in diameter by four feet high and took about 45 bags of leaves shredded with my lawnmower and I added a few big handfuls of finished healthy compost as an inoculum. Took five hours of constant “hard labour” as I had to soak a drain outside, then carry inside.. Do not compress the leaves in any way. You can overfill the bin as high as possible and it will soon settle down. Make sure to keep a tarp on it too. Since it’s outside you will have to add a gallon or two of water every day. Try to monitor the leachate and use that to regulate your watering. A piece of plastic under the pallet will assist in that.
Since it appears you’ve just built this unit, I’d suggest you dismantle it wait until you gather more leaves and add the breathable fabric liner as per the guidelines, and don’t forget the bottom too. I used geotextile, but you can use the material they use on greenhouse floors, or a couple layers of burlap. Landscape fabric is a last choice… I despise that stuff. Sew it on as per directions. Building in the shade will reduce water needs.
BTW, if you use tap water, it must be dechlorinated. Chlorine is designed to kill bacteria, and that’s what we’re trying to grow. You can allow the water to sit for a day to allow chlorine to evaporate but not so good if your city uses chloramine. Best to treat water with humic acid (available on .Amazon) at a rate of ONE DROP PER GALLON . Rainwater is even better.
Happy composting!
corry mcclure
Everything I needed to know to build my small backyard bioreactor. Thank you for this wonderful website, resources and highly interactive participation. I will continue to visit when I can!! Cheers, Corry